Lync Server 2010 Address Book Normalization
28/05/13 17:14 Filed in: Lync
Run through of Address Book Normalization in Lync 2010.
====
Yes, yes, I know - Lync Server 2010 - Old hat now with Lync 2013 out in the wild. This was for somebody specific but I thought I’d share as people may find it useful. It’s also pretty much the same process for Lync 2013 too.
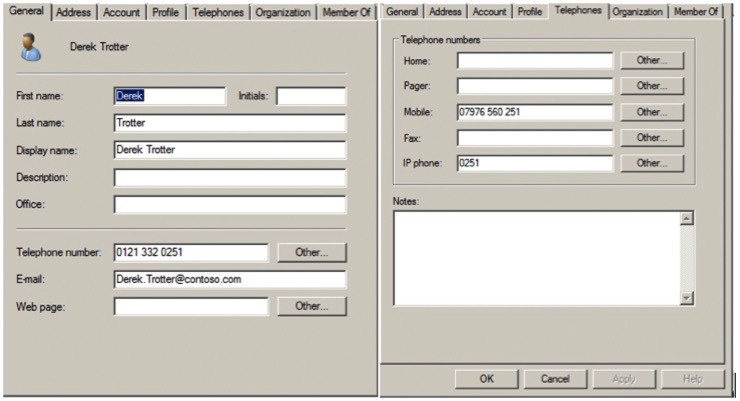
So, what’s the problem? Well, at a very basic level numbers in Active Directory that are not in E.164 format (I.e. +441635… etc.) do not get presented in the Lync client. By way of example, we have a user called Derek set up with the following telephony information:
Note the normal number format? The result of this - without normalisation - is that you cannot view the numbers in the Lync client:

..which isn’t great. What you want, is for the Address Book Service to convert those numbers in to E.164 so you can see them. Fortunately, it’s simple to do - before we dive in to it though, let’s look at how we can set up a client to test your address book normalisation.
With Lync 2010 - the address book is not downloaded immediately. There’s a delay of up to 60 minutes before it’s downloaded. This can be a pain for testing. Fortunately, there’s a registry key that you can set that will force the download of the address books immediately. I wouldn’t put this out in general deployment, but it’s handy for testing purposes. Anyway, this registry key is:
HKLM\Software\Policies\Microsoft\Communicator\GalDownloadInitialDelay
Set that entry to 0, restart the Lync client, and your address books will be downloaded immediately.
As a side note - be aware this is different for Lync 2013. To achieve this in Lync 2013, please see:
Downloading the Address Book in Lync 2013
So, setting that enables testing of your address book normalisation far easier.
Create the Normalization Text File
The first thing we need to do, is to create the text file containing our normalization rules. Where do you put it? Well, you need to know where your Lync share is - the one you specified when you built your system. In my demo lab for example, you can see the location from Topology Builder like so:
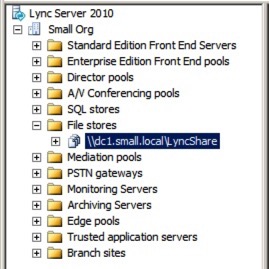
So my share is \\dc1.small.local\LyncShare
You need to create a text file:
- Called ‘Company_Phone_Number_Normalization_Rules.txt’
- Located in \\server\Lyncshare\1-WebServices-1\ABFiles
Once created, it should look something like this:

So what do we put in to this text file? Well, each normalization consists of two elements - first the matching pattern for numbers that we want to normalise, and then a transformation pattern that tells us how to normalise the number. Fortunately, Lync 2010 normalisation ignores non-numerical characters such as spaces and the like, making the normalisation patterns far simpler.
The following example shows the normalisation rules for converting International and national numbers from their normal format to E.164:

Note that the first line is the pattern match (I.e. the search), and the second line is how to transform. The first rule/transformation checks for international numbers starting with 00, drops the 00, and adds a +.
The second rule set checks for numbers starting with one 0, drops the 0, and adds the +.
Update the Address Book
The next thing we need to do, is update the address book. To do that, fire up the Lync Server Management Shell, and use the following command:
update-CSAddressBook -verbose
You can leave the verbose off if you want - it just adds more info to the logs.

It’ll take up to 5 minutes to run - you can check in EventVwr to make sure it’s completed. Look for event 21056:

Test on the Lync Client
Firstly, make sure you delete these files from the Lync client profile:
- GalContacts.db
- GalContacts.db.idx
They will be located in the user profile folder somewhere under AppData - note this is a hidden folder usually, so make sure you turn on hidden folders if you want to find them. By way of example, on my demo lab with Lync 2010 running on my Windows 2008 R2 server, the location is as follows:
C:\Users\administrator.SMALL\AppData\Local\Microsoft\Communicator\sip_andy.pandy@contoso.com
I’m logged in as Administrator, but I’m logging in to Lync as Andy.Pandy@contoso.com.
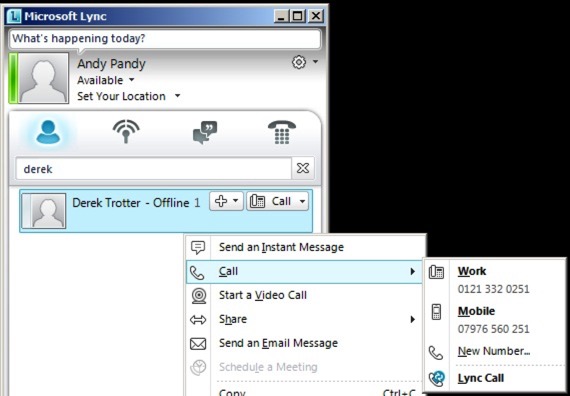
So once you’ve deleted those files, login to your Lync client - if you’ve set the registry key correctly you should see replacement GalContacts files download pretty quickly. Once that’s happened, check your user information for your contacts - you should now be able to see their telephony:
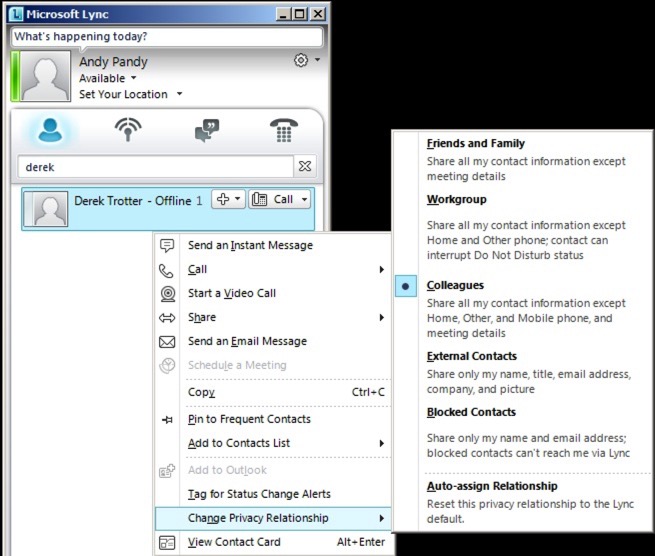
Also, don’t forget your privacy relationships while testing! If you’re checking a user who doesn’t have you in the right privacy group you may not be able to see their mobile number for example, regardless of normalization:
Summary
It’s not that difficult is it? I suppose in some ways it depends how clean the data is in your directory. Lots of messy number formats could lead to lots of messy rules - I’d be inclined to try and clean up the data in your directory!
Also, how do you formulate all those nasty looking RegEx rules? There’s loads of resources out there on the Internet - but funnily enough, there’s a fairly useful one built in to the Lync Control Panel. You’ll need permissions to be able to edit dial-plans though to use it….and a certain amount of care to make sure you don’t modify/add anything that could disrupt your day.
Essentially, if you go in to your Lync Control Panel, then go to Voice Routing, and then edit any dial-plan that you have (Like I said - be careful not to change/commit anything). You’ll see on that screen a section for ‘Associated Normalization Rules’:

If you click ‘New’ in there, you can use the wizard to create the rules for you. For example, in this one I’m looking for a number that starts with 00, and is at least 11 digits long. I then want to drop the two leading 00s, and add a +:

Notice that it produces the pattern-match and the translation rule for you? You can select/copy/paste them in to your normalization file - how easy is that? Also, down the bottom, see that you can type a number in to test the translation too?
Also, remember if you do accidentally change or modify anything in there you don’t have to commit it - just exit out of the Control Panel.
I’ve done a small video run through here which shows the whole process end to end:
blog comments powered by Disqus
