Configuring Windows IIS ARR
Details the processes involved in configuring Application Request Routing (ARR) for reverse proxy services.
====
With the demise of Microsoft ForeFront Threat Management Gateway, I get asked repeatedly about what reverse proxy products are suitable for Microsoft Lync. Of course there are a raft of products out there capable of reverse proxy services - some of them quite expensive..There is also one that’s free - it’s called Application Request Routing or ARR.
You can have a look at the web site and read all about it here:
Application Request Routing
This is a plug-in for IIS that full supports Reverse Proxying, and is supported for Microsoft Lync usage. It’s pretty powerful in its own right really - but for the purposes of this blog I’m going to focus on the reverse proxy element.
Another useful feature - especially if you’re tight on public IP Addresses - is that multiple web sites can be proxy’d from a single IP address. I can have for example:
https://webmail.contoso.com
https://sharepoint.contoso.com
https://Badgers.contoso.com
…all listening on one public IP Address but being routed to three different back-end web servers. The proxy is routed differently depending on the requesting URL.
So to look at what’s involved in configuring the reverse proxy, first let’s look at our lab environment. It’s detailed below. Click on the image to see a larger version.

Configuring the Reverse Proxy Routing
Firstly, there’s a few things to watch out for when you’re configuring the Server itself. I prefer to have two interfaces on these units - one internally facing, and one externally. The issue with having multiple interfaces is ensuring that the correct traffic goes out via the correct interface - if it doesn’t, you’ll have issues with your firewall rules won’t you? This article below explains what you need to watch out for on that front:
Dual Homed Servers
Certificate Considerations
I want to be able to access my https sites from one IP address - to do that, I need a certificate that has all of the destination URLs listed in its Subject Alternative Name (SAN) field. So, for my lab, I have one certificate that has extweb1.contoso.com & extweb2.contoso.com in its SAN. This is then bound to the default web site within IIS. Without the AAR configured, connecting to https://extweb1.contoso.com for example, brings up the default page of the IIS installed on the reverse proxy server.
Installing ARR
Installing ARR is simple. You can get the code, and run the installer from this web site here:
Application Request Routing
There’s also some more detailed installation instructions here should you want to dig a little deeper.
Configuring a Reverse Proxy Rule
Let’s look at configuring the RP rules. We want multiple URLs routing to different hosts, so we need to configure multiple rules. In addition, I only want to Reverse Proxy HTTPS requests, not HTTP. To do this, we need to do the following items:
- Configure our server farm within ARR
- Turn off SSL Off-loading (Important!)
- Delete the HTTP rule
- Modify the HTTPS rule so that it only routes the requests that we want, and not everything
That’s really all there is to it! So let’s look at each bit - specifically, for the extweb1.contoso.com website.
Configure our Server Farm for ExtWeb1.contoso.com
Fire up Internet Information Services Manager, and expand down the panels on the left - you should see a new entry - Server Farms:
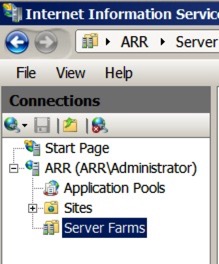
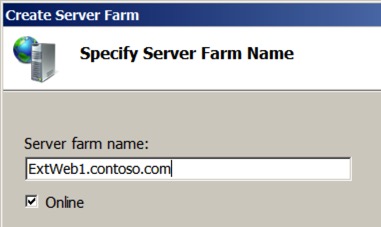
Right-click on the server farms, and select ’Create Server Farm’. You will be asked to give it a name - use the External Web Site address as it makes it easier to track. For this example, I used ‘ExtWeb1.contoso.com’. Make sure ‘online’ is selected, and hit next.
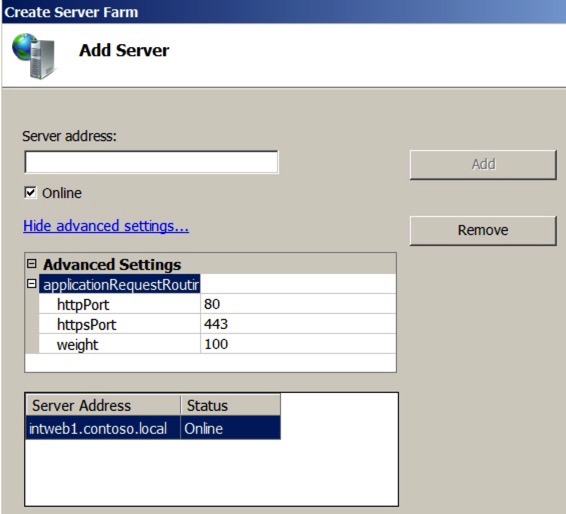
At the next screen, enter the target address that you want to route to. For example, I want ExtWeb1.contoso.com to route internally to IntWeb1.contoso.local. In addition, you Microsoft Lync People, you can modify the target ports here too (to 8080/4443 for example) by hitting the advanced button. Make sure you hit ‘Add’ to add the destination server to the list.
Once you’ve done that - hit finish. You’ll now be asked if you want to create the re-write rules - like below - click ‘Yes’. Note that if you have already created a proxy rule you may get a message saying that the system wants to create a conflicting rule - that’s because by default the rules capture all traffic, not just the traffic we’re interested in. We’ll modify that rule in a minute.
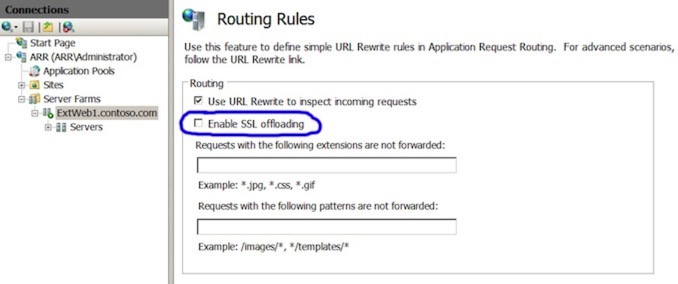
Now, we need to turn off SSL Off-loading, and optionally turn of disk-caching. Again for you Lync people, make sure you turn off caching as this causes issues with the Lync Web Services.
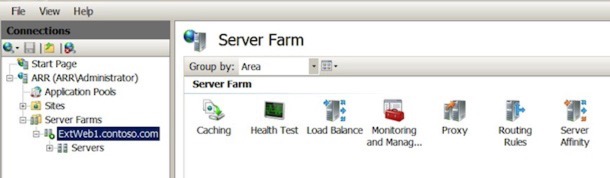
Under the ‘Web Services’ section now in the IIS Manager, you should see the Server Farm we have just created. Select it, and you should see all of the options in the right hand pane, like so:
Firstly, select the ‘Caching’ option and turn off disk-caching. Next, select ‘Routing Rules’ and make sure you turn off ‘Enable SSL Offloading’.
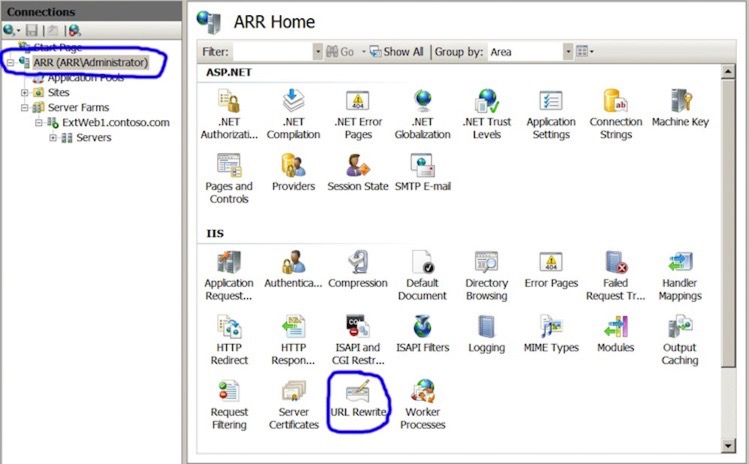
For our final trick, we are going to modify the re-write rules so that it only captures and routes traffic for ExtWeb1.contoso.com to IntWeb1.contoso.local. To do this, select the very root of the IIS installation, and select the ‘URL Rewrite’ option as highlighted below:
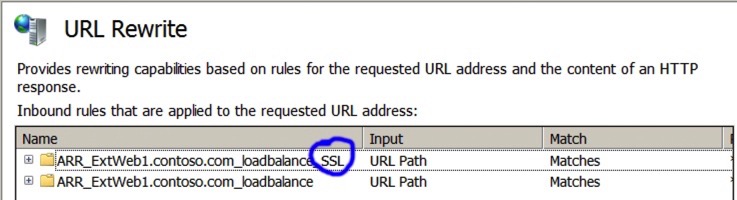
In the URL Rewrite Screen, you should see a couple of rules for the farm we have just created - one for HTP and one for HTTPS (SSL). In my lab, I’m going to delete the HTTP one as I don’t want to forward HTTP requests, only HTTPS - note that the SSL/HTTPS one has an SSL marker on the end. Use the ‘Remove Rule’ on the right hand pane to remove the HTTP one it hat’s what you want to do.
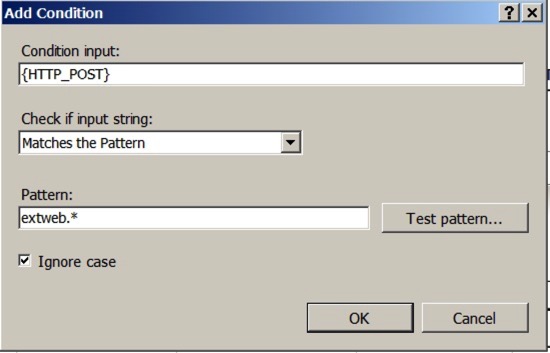
Next, we’re going to modify the SSL rule to only affect traffic for extweb1.contoso.com. To do that, select the rule, and hit the ‘Edit’ button on the right hand pane. Further down the page, you will see an area marked ‘Conditions’ - these are the conditional modifiers to apply to the rule - you will see there is already one there making this rule match traffic that has HTTPS switched on. Click the ‘Add’ button to add a new rule - note that it’s {HTTP_POST} we’re interested in, but you can select it from the list rather than type it in.
Click ‘OK’ and then Apply the rule … and you’re done! Easy isn’t it? You can then go through and add in Server Farms & rules for other specific routing requests with different targets. For Microsoft Lync for example, you could have your meet, dialin, and web-farm stuff all directed appropriately.
Video Run Through
I’ve also put together a video showing the whole process from start to finish - you can view that below.
blog comments powered by Disqus
